#22 Domain Shifts: Applied Metamorphosis 101
Why?
Simple: I haven't seen enough people do this and they ought to. Its cool. Trust me.
What?
Ok lets start at the beginning: what's a domain?
Doesn't really matter that much, really, damain thing is that you gotta change it and then back.
To give you an example, you may recall from high school math that instead of multiplying two numbers you can convert them to their logarithms and then merely add those instead and convert the result back. In our cases here what that translates to is that you can expand the possibilities of many filters by applying them in another domain. Hang with me... no math involved, for you numerophobics
There are not that many reversible domains in Photoshop as yet ( future plugins will provide more, I'm sure), but what there is, can be surprising in its effectiveness.
How?
1. Simplest in the bunch is a shift in the 2-D spatial domain: move the image, do something and move it back. Check this out for starters: the image here before
fig 1) 
Mona in fine spirits, centered
2. The idea is to offset the image so the corners move to become the new center. This is done by applying the Filter > Other > Offset. To find out the dimensions, hold down the option key and click on the image size area of the window ("30K" here, an obviously ridiculously tiny example...)
fig 2) 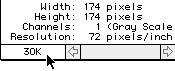
The pop up indicates the height and width.
3. Now simply offset the image half way over and down...:
fig 3) 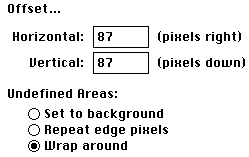
Entering exactly half the width and height and turning on the Wrap option
4. That gets you to this stage:
fig 4) 
Offset image has the old corners at the center...
5. We then apply something which is "center" based. such as Twirl, Pinch, Spherize etc... and afterwards offset back again. Here is a couple of applications of Pinch at "99" :
fig 5) 
Pinching in the offset domain
6. Now to see the completed effect all we need to do is to convert the image back to the original domain, which in our case is merely a reverse offset. You can actually simply apply the Offset filter again or enter a minus sign in front of each number to move it back.
Here is the final effect:
fig 6) 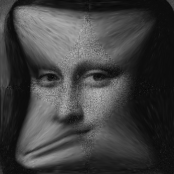
A whole new filter: CORNER PINCH !
7. As we can see this netted us a new filter type! Pinch, which was constrained to the image center, has now a Corner-Pinch variation. Pretty cool, but the mere beginning: realize that ANYTHING that you do "centered" while in that domain-shifted state will now be "cornered" instead. Very neat, Pete
Here is an example of a zig zag wave applied to corners first, using the above technique, and then an additional one in the center, giving lovely interference wave effects. (Complex metallic gradient as a background) Original file much larger of course...
fig 7) 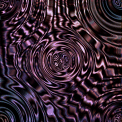
Liquidity unlike you had before...
The entire process can be made into a simple macro, by the way, except that the image dimensions will have to vary.
Note: You can also shift the center to any other spot in the image: turn on the info window, click on the real center and drag to the desired new center (e.g. Mona's left eye...) Note the offset numbers in the info window and type them into the Offset filter, then proceed as above. Afterwards add a minus sign before the two offsets and you are back...easy.
8. There are other such conversions: you can use Pinch and Spherize at "-99" then do something and convert back via the same filter at "+99": the image will be essentially the same (some conversion loss) but the effect you added takes on a curved look ...:
fig 8 a)  fig 8 b)
a) The initial image, then b) Spherized at -99 and a linear grid applied
fig 8 c) 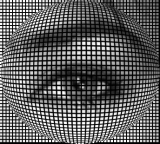
After reconversion with +99 the eye is linear again but the grid is distorted...
This too is a very general technique which can apply to any number of effects. Among the linear operations one can even count simple blurs and sharpens or find edges...
The effect can be softened at the edges by feathering...
Remember to think this through as an abstract notion, not a follow the steps, paint by numbers deal.
"This is not Simon says....", said Simon.
9. More complex domain shifts can be had with complementary Displace filters (think about that if you are a serious pro here) , but an obvious one is the Polar coordinates. I touched upon it in the tip regarding that filter, but to enhance the description with regards to this topic: the conversion from Cartesian rectangular grid space to the domain of Polar co-ordinate circular grids can yield some great effects!
fig 9 a) 
The original Leonardo image
(algorithmic Chops/Arbmap gold, by the way...no brush tools whatsoever!)
fig 9 b) 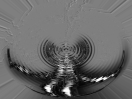 fig 9 c)
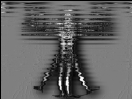
b: first converted from Rectangular to Polar, then a ZigZag filter applied
c: the circular waves after conversion from Polar back become linear ridges!
Of course thats like a new filter, there is no such thing now
fig 9 d) 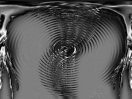 fig 9 e)
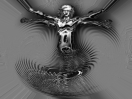
The converse operation is similarly effective: instead of circular-to-inear one can achieve a double-circular-effect by converting polar to rectangular first, applying the ZigZag there and then converting back to polar... Very fluid smooth curvature motions can be created easily! Do try this!
10. As a little outlook on future domain shifters here is one tiny picture showing another mathematical space, the 1/c circular domain. A future plug-in called "Vortex Tiling" will allow access to this and in certain settings back again! You can imagine that linear operations within this domain will come back in amazing perturbations afterward...
fig 10) 
Vortex Tiling about 6,000 copies of the original Leonardoid
approximate time at 640x480 on a Quadra is 7 seconds (!)
Well, I hope this got your noodle twitching (I am talking about your brain, dude) on how to multiply the effectiveness of your filters far and wide. This is not a road travelled by many and I have seen precious little about this topic (otherwise I wouldn't have written about it, I guess) but there are plenty of subtle new areas to explore and effects to be found. I trust most of you know how to interpret tips of icebergs...
Send me examples as you come across them, report your findings in the AOL keyword "kpt" area and in general share profusely and sincerely.
All I ask is that you spell my name right and remember where you found it when they make you head of the art department ; )
As usual, post something warm and fuzzy on Compuserve or whereever the hell you found this (its on dozens of services, counting only the ones that I have been told about). On America Online the combined total downloads are now past 30,000 I guess it got a little out of hand...thanks for your interest and time though!
Final advice: read a good book and snuggle up to your significant otherness.
Once a week: forget the Mac!
By Matthias Müller-Prove. Modified:
5/1/20
