#9 Undiscovered Heroes: Polarizing...?
Why?
Because probably everybody played with each filter at least once or twice and, when it didn't spit out the instant "Mona Lisa" right away, filed it under "yeah, yeah,...next?". Bad move.
The one little gem I'd like to help to some broader appreciation here is the Polar Coordinate converter. Did you have any idea what the hell Polar is all about, and I ain't talking about white bears, either...?
Before you scroll down any further, look at fig 1) and try to imagine quickly what would happen to that image if you ran it through the polarizer...
Hey, its a puzzle.... (Not easy, even...)
fig 1) 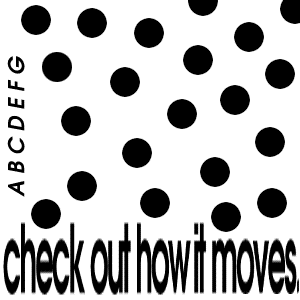
The source image with some text and big dots. What will happen to it in polar coordinates...?
What ?
Well, without further ado, I present you with the results. Surprised? Amazed? Befuddled?
fig 2) 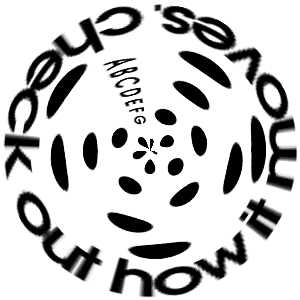
What-the-hell-happened-to this-thing? "after" conversion image....
The math seems relatively obvious: there are two methods to map x-y coordinates onto a two dimensional plane, one Rectangular (as in the old Cartesian system) the other Polar (as you may have seen in Filter Response Plots and other time, seasonal or engineering charts). In 3-D space, thats analogous to a `Cube' versus a `Sphere', if that helps you to visualize it.
The filter allows you to convert in either direction, here we obviously took the rectangular and polarized it (ej, Kai, semantically unorthodox usage of the verb `polarize') (I know, piss off).
You notice a few details: the left edge of the rectangular image become the radial line `at Noon' and the image is then essentially swept around a 360 degree circle in a counterclockwise direction. The bottom of fig 1) travels around the outer edge in the resulting fig 2). The entire right edge in fig 1) is concentrated down to a single pixel in fig 2).
One implication is that the bottom area in fig 1) will have to cover a much larger area on the outer bands and is therefore stretched much further in fig 2): That will result in an increased visual blur, in this case the amplified anti-aliasing of the text. The distortion stretch effect can easily be judged by the blobby shapes that the original circles take, and note how that changes with distance from the center.
Ok, after the little demonstration of the basics (read the description of this in the other PS sources to compare, all 3 sentences of them....) I want to show you what all this can be used for in the real world...and it can do lovely things!
How?
The whole point here is to start `thinking polar' : conjure up something that might be interesting and / or useful when swept around a circle. It's not hard, take this little example:
fig 3) 
The original rectangular coordinate system `normal' logo of a company with a loopy name.
This image was placed in the center portion of a 300x300 grayscale window. Important, because if the window were snug around this rectangle....well, try it.
Hit that Filter > Distort > Polar Coordinates... and behold the rotational excellence.
fig 4) 
The converted logo. Still loopy, but round!
Sure, the arrow is bent a little, but you can clean that up. Of course you could have gone into Freehand or Illustrator and create curved path text and import the EPS, but this is a much more general method. It will work with anything! And do so rather quickly...
Ok now lets go the other way....
fig 5 a)  fig 5 b)
Here we have the original image in `pretend' polar form which we convert `back' to rectangular..whooooaaa
Aside from being a cool way to visualize the math it can make for very interesting effects. Can you see it already?
Now are you ready for some magic? Double Polarization into Infiniy (not the car)
fig 6 a) 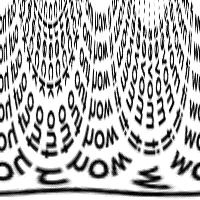 fig 6 b)
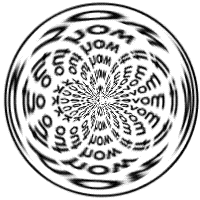
Fig 5 b) which was over-rectangularized, flipped up becomes 6 a) which then polarized becomes 6 b)
We don't call our company Curved Space for nothing!
fig 7) 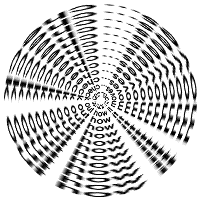
If you take the plain 5 a) and directly polarize it here are the circularific results...
This is a really cool technique to come up with textures that are REALLY different...
You may have gotten the hang of it by now. The two directions of the filter are becoming predictable and thereby repeatable tools rather than random effects. For instance, it is now perfectly straghtforward to deduce what would happen to a texture such as the old Instant Brushed Aluminum.
If you start with vertical stripes, look at the far left edge and place that in the center-to-top `noon' position, then as the image scans to the right you sweep around counterclockwise. It is not THAT hard to see that you will create a radial pattern, which in this case gets `modulated' by the randomized variations. This also inherits features similar to the Zoom Blur...a lot faster though.
Lets see this in action:
fig 7 a) 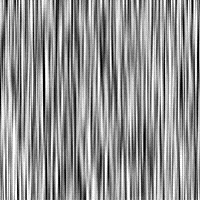 fig 7 b)
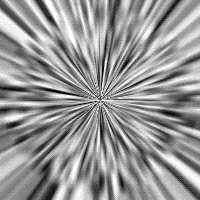
The texture generated via the KPT #3 Brushed Aluminum and its derivative polarized version
And further on, if the stripes are horizontal to begin with, the sweep will generate concentric circles...
Tip > for best results pre-blur the lines a little since the polarizing itself is not going to be anti-aliased.
Also notice in fig 8) how the gradation from top to bottom will be turned into a circular gradient. It is just like turning the blend tool from linear to radial! (Think about that...neat possibilities)
fig 8 a) 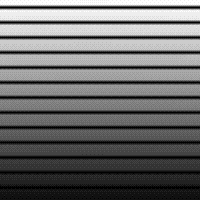 fig 8 b)
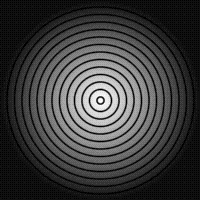
Horizontal lines turn into concentric circles....vertical wash into radial gradient...
You can now literally `design' the results to match. the number of concentric circles, size, color....
and if the stripes are vertical with a wash that would look like this variation:
fig 9 a)  fig 9 b)
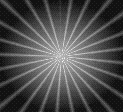
Thin white stripes on a wash result in white `rays' from a point lightsource
The number of variables are surprising and the effect can catch you unexpectedly, too.. Here in fig 10) we merely turn the stripes sideways, not much more than fig 8a) at 45 degrees....but who expected this:
Instant spirals...?
You can tell how many alternates are looming here again. Notice how the gradient that went diagonally from the upper left turns into that nice sweep blend... Would you know ANY other way to create that?
fig 10 a) 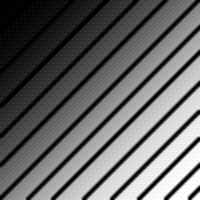 fig 10 b)
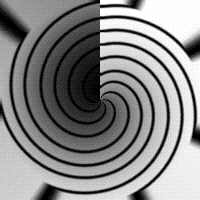
Fig 10 b) also shows the error associated with the conversion: in the polar definition the outer edges touch on undefined infinities, since all of 10 a) is essentially represented in the inside circular area in 10 b) The square edges are kind of just wrapping around.
A quick conversion and immediate back conversion will show you that Photoshop is doing a very good job handling this, but there are mathematical limits and the re-converted image will suffer distortions.
You can also try this with other complementary filters, such as Spherize and Pinch...(both of which accept negative numbers as well)
One last sample of further subtleties...the vertically flipped 10 b) further polarized becomes 11 b), kind of round isobar lines or stress analysis patterns.
fig 11 a) 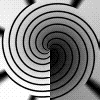 fig 11 b)
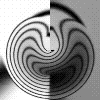
From straight spiral arms to wildly meandering round moires
I think this little filter is quite a gem, and rather undiscovered from what I can see. I have by no means come near exhausting the surprises here, I mostly tried to encircle somewhat methodically what the general idea space consists of and how to describe the effects in ways that allow you repeatable `tool' results.
PS:
If you have some variation that pushes this envelope, great! By all means keep it to yourself and don't tell anyone. Especially don't post a note in the KPT messages section because others will find out quickly and might have other `friendly exchanges' with you. You don't need that! You already have every possible file and know all there is. And a pat on the back has never been good for your fragile psyche.
Happy Photoshopping, Kai Krause
